LEGO® is a trademark of the LEGO Group of companies which does not sponsor, authorize or endorse this site

Lego Eagle Transporter: updated Apr 2024

This is a record of my Lego MOC Space: 1999 'Eagle Transporter'.

For any of you that don't know it, 'Space: 1999' is a British science-fiction television series that ran for two seasons and aired from 1975 to 1977. It was produced by Gerry and Sylvia Anderson (of Thunderbirds fame). Although it was only two seasons they managed a whopping 48 episodes.

The Eagle Transporter was the workhorse spaceship of the series and was designed by Brian Johnson who had worked with Gerry Anderson on Thunderbirds in the mid-1960s

The Eagle spacecraft heavily influenced not only me, but the spaceship designs of Star Wars and many subsequent science fiction films and television series.

The plans are for sale, just drop me a line at legoinstructions@spencerplanton.com.

click to enlarge

Looking for purchase instructions?

My ‘instructions’ are supplied as files for the LDD or Studio I/O Lego design software, rather than printed PDF files you can print and follow.

The model is so vast and complicated that printed PDF build images can be confusing. Using the software means that you can have a huge amount of flexibility with your build and create your own interactive build instructions (easily from LDD). The interactive instructions allow you to swivel the model and see the pieces being fitted from any angle - a great tool!

Files are now shipped in Studio IO and LDD native formats, allowing you to use your favourite virtual building application to create parts lists and 'play' with the model. Complete Studio IO instruction manual in the process of being made. Watch this space!

To purchase, just email me at legoinstructions@spencerplanton.com

Price is £12(GBP) and payment is through PayPal (friends and family payment please).

Are these the same instructions that used to be on eBay?

Yes they are!

Until recently the instructions for this MOC project were available on eBay but a recent legal agreement with the Lego corporation resulted in eBay banning any listing using the word 'Lego' that isn't an authorised Lego product.

This sweeping agreement is aimed at all the Chinese copy-cat building brick sets but it seems to affect anyone advertising anything to do with Lego; including my MOC build instructions!

As you can imagine, advertising a set of Lego instructions without mentioning the word 'Lego' was going to be prohibitive, especially given that Lego brand is pretty much a universal descriptor and without using the brand name no one was going to find the instructions.

It would have been like trying to advertise 'air pocket protective packaging' because the term 'Bubble Wrap' is actually a brand name of the Sealed Air company!

Anyway, the upshot of this was that I was that after five years my listing was unceremoniously removed and I was 'advised' by eBay not to advertise any more. Failure to do so would result in action against me. So Lego got eBay to protect the Lego empire from a genuine enthusiast. Way to go Lego!

Feel free to get in touch to talk about the model: legoinstructions@spencerplanton.com

Update - Lego digital designer software update causing missing pieces.

Looks like some people are having issues with the latest version of Lego Digital Designer ‘Missing Parts’.

A fully working version of LDD 4.3.11 is available here:

Lego LDD 4.3.11

LDD models import into ‘Studio IO’ by Bricklink.

Studio IO

Studio is a great tool, a bit daunting for a new user as it looks a lot more ‘technical’ than LDD but trust me; it’s not so bad and it is a lot more powerful.

The first time you run Studio, you may need to do a ‘Run as Administrator’. Other than that it works like a dream.

Many people prefer to use LDD, especially for instructions.

Idea

What was I thinking!

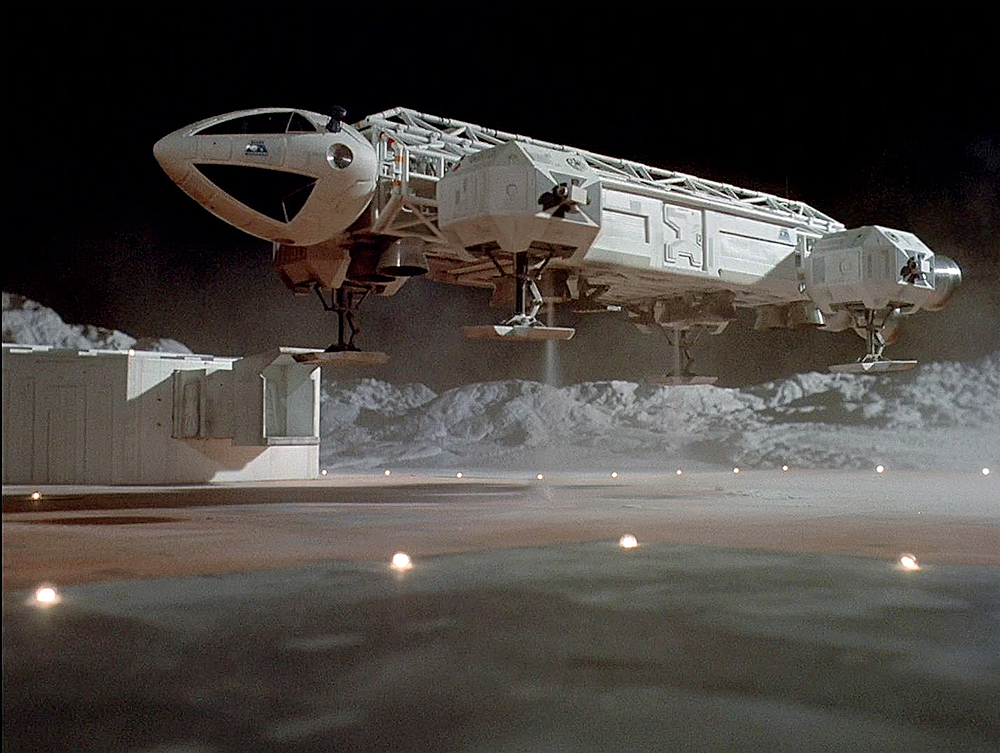
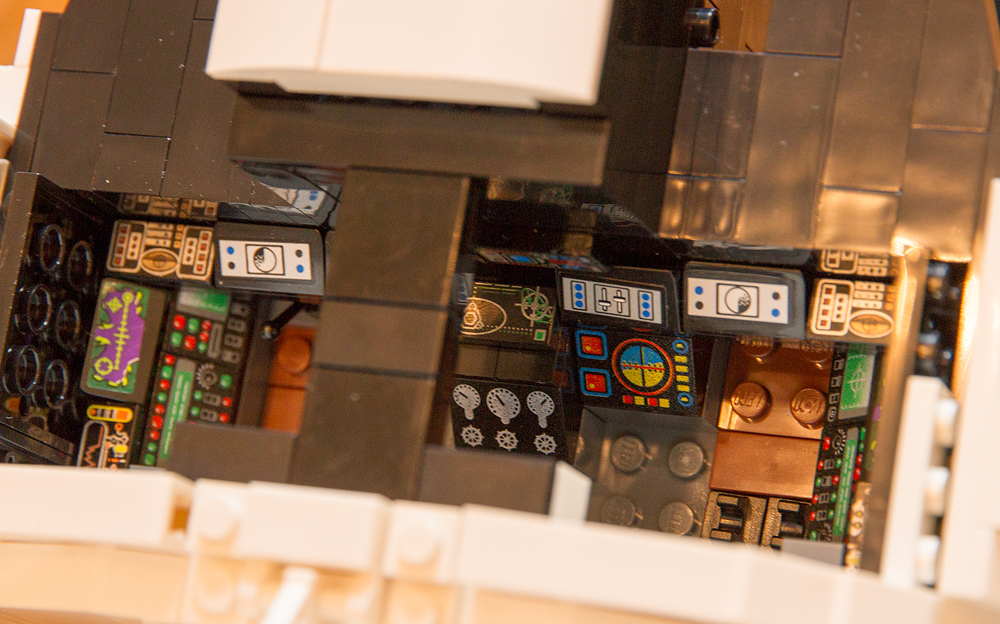
As a child of the very late sixties and early seventies I adored Space: 1999. You have to cast your mind back and remember that this weekly series pre-dated most modern space series and films by a significant margin. Space was not particularly 'cool'. They were still running 1950's Flash Gordon on T.V. with it's clunky riveted spaceships. Stanley Kubrick's film 2001 was pretty slick but it was only on T.V. once in a while and usually late at night (and age seven it got boring in the last third). Then along came Space: 1999. The story lines were cheesy and the fashion was questionable but it was the seventies, so that was kinda normal. The main bit for me was the tech - it was super cool!

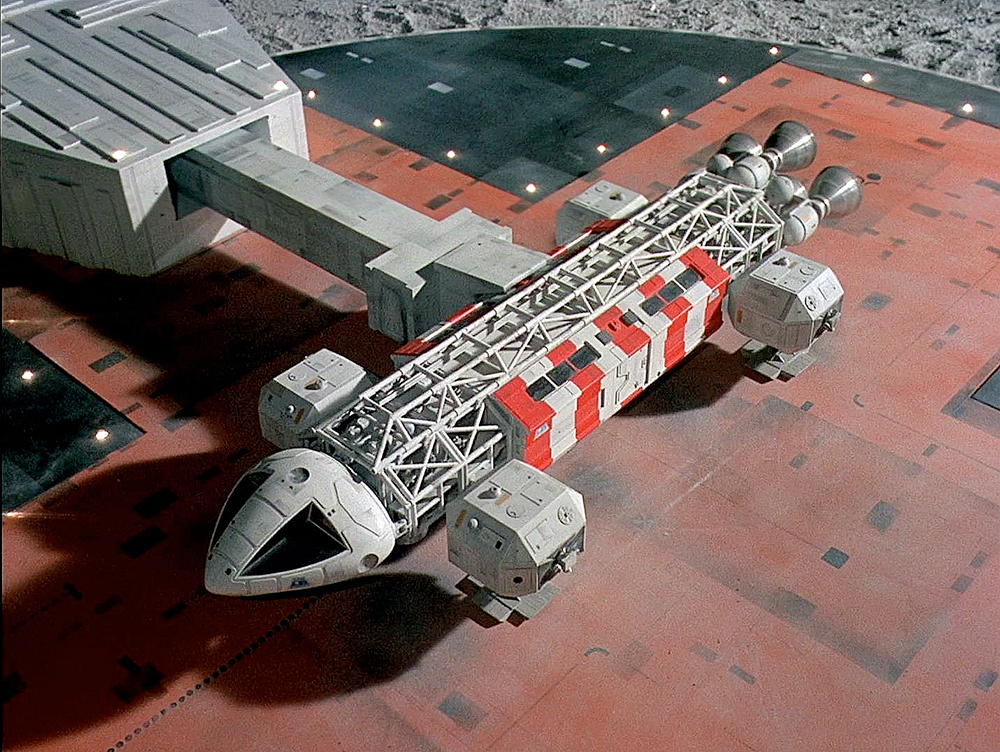
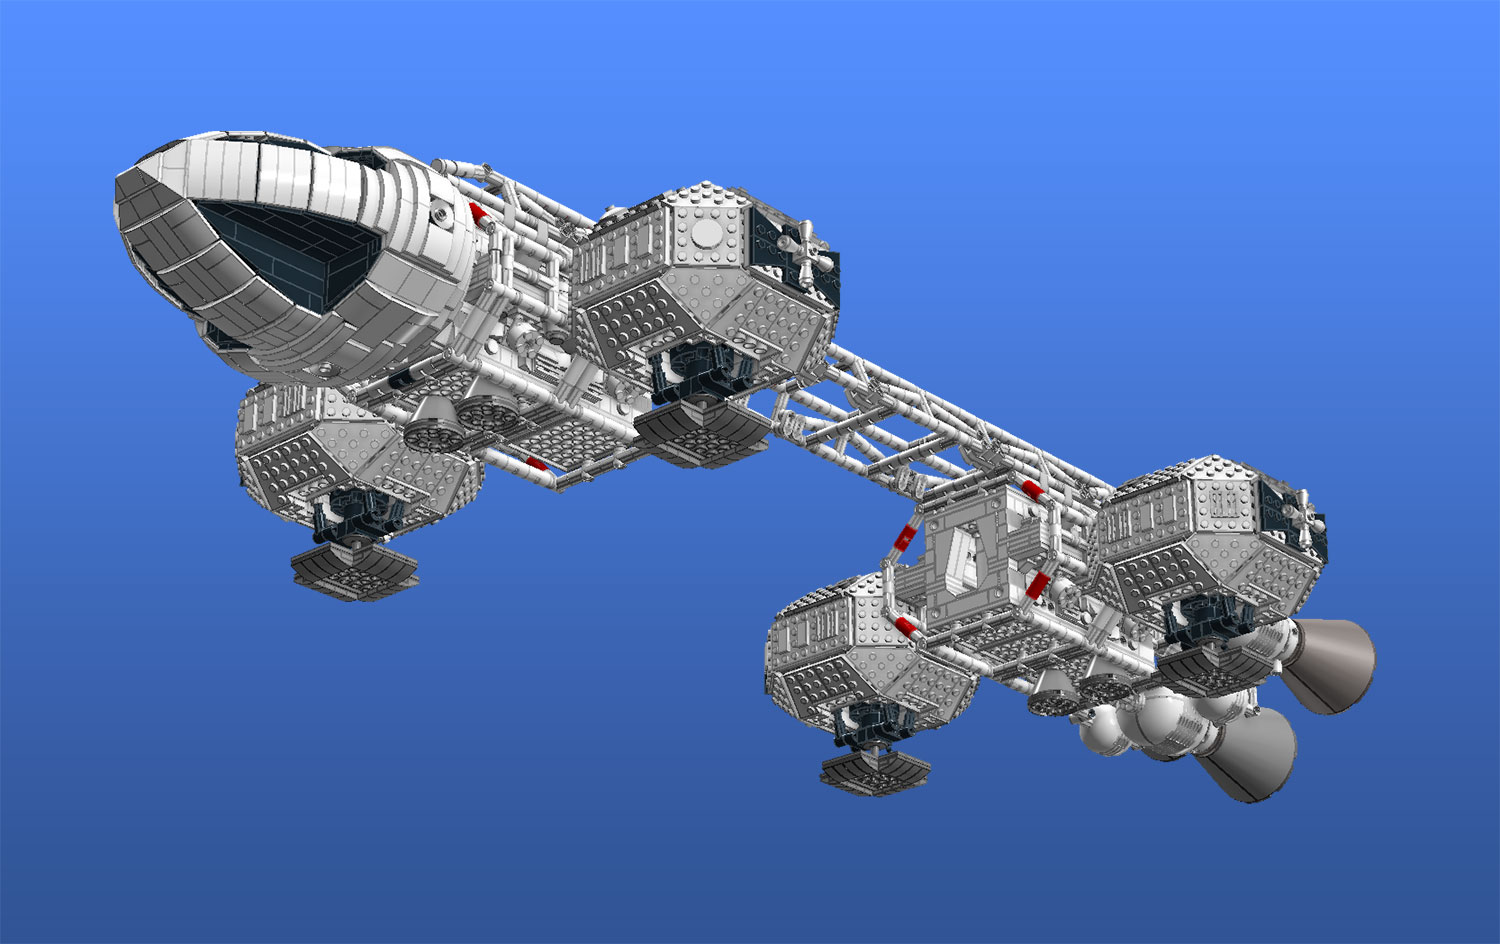
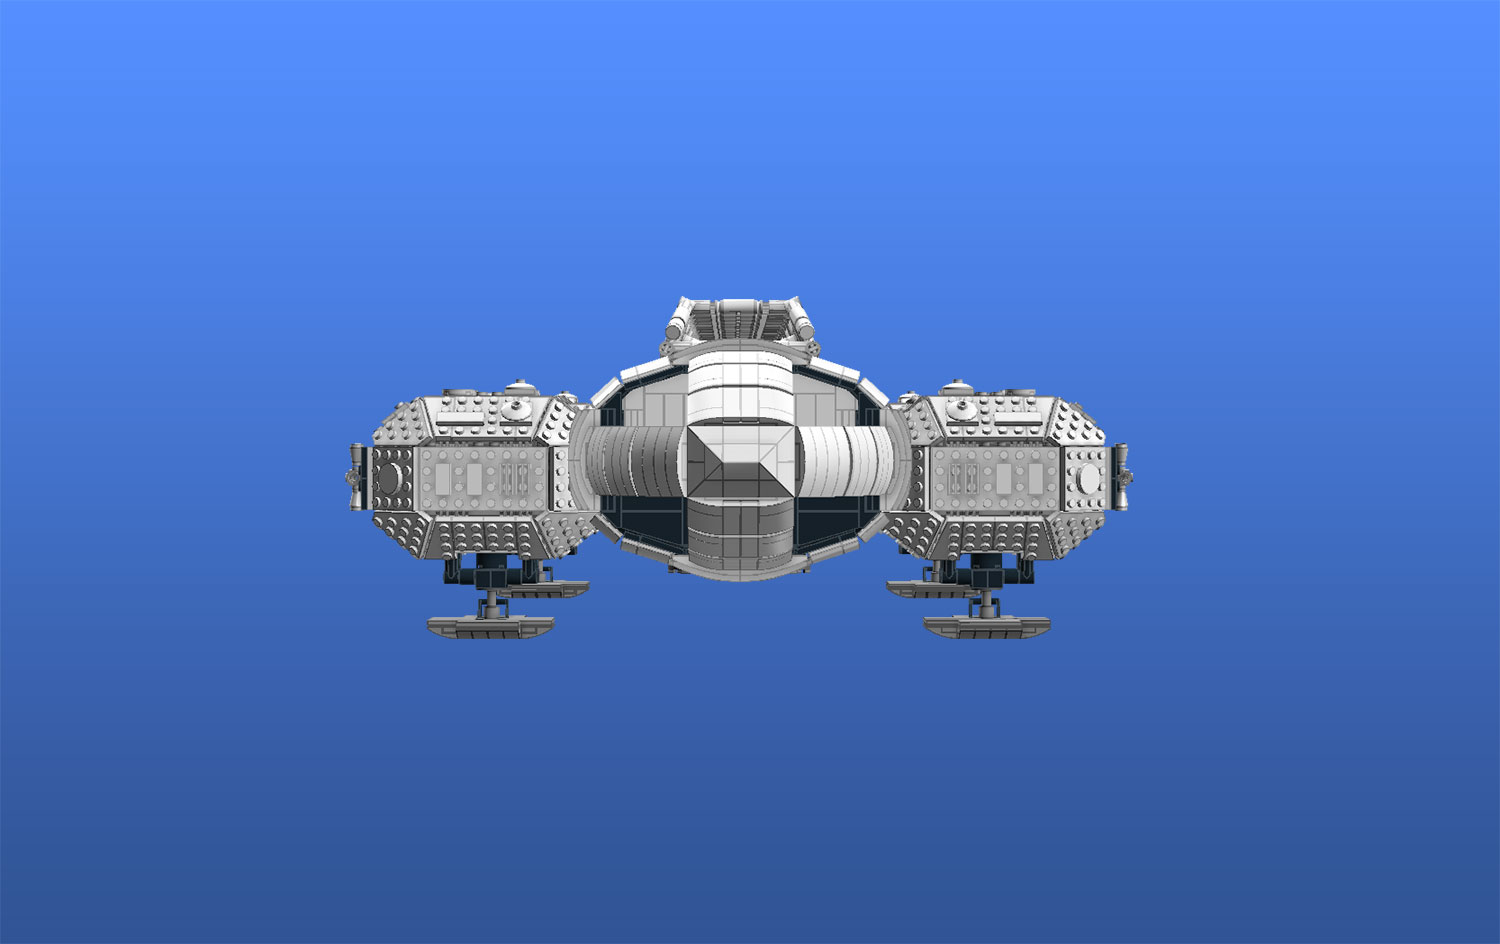
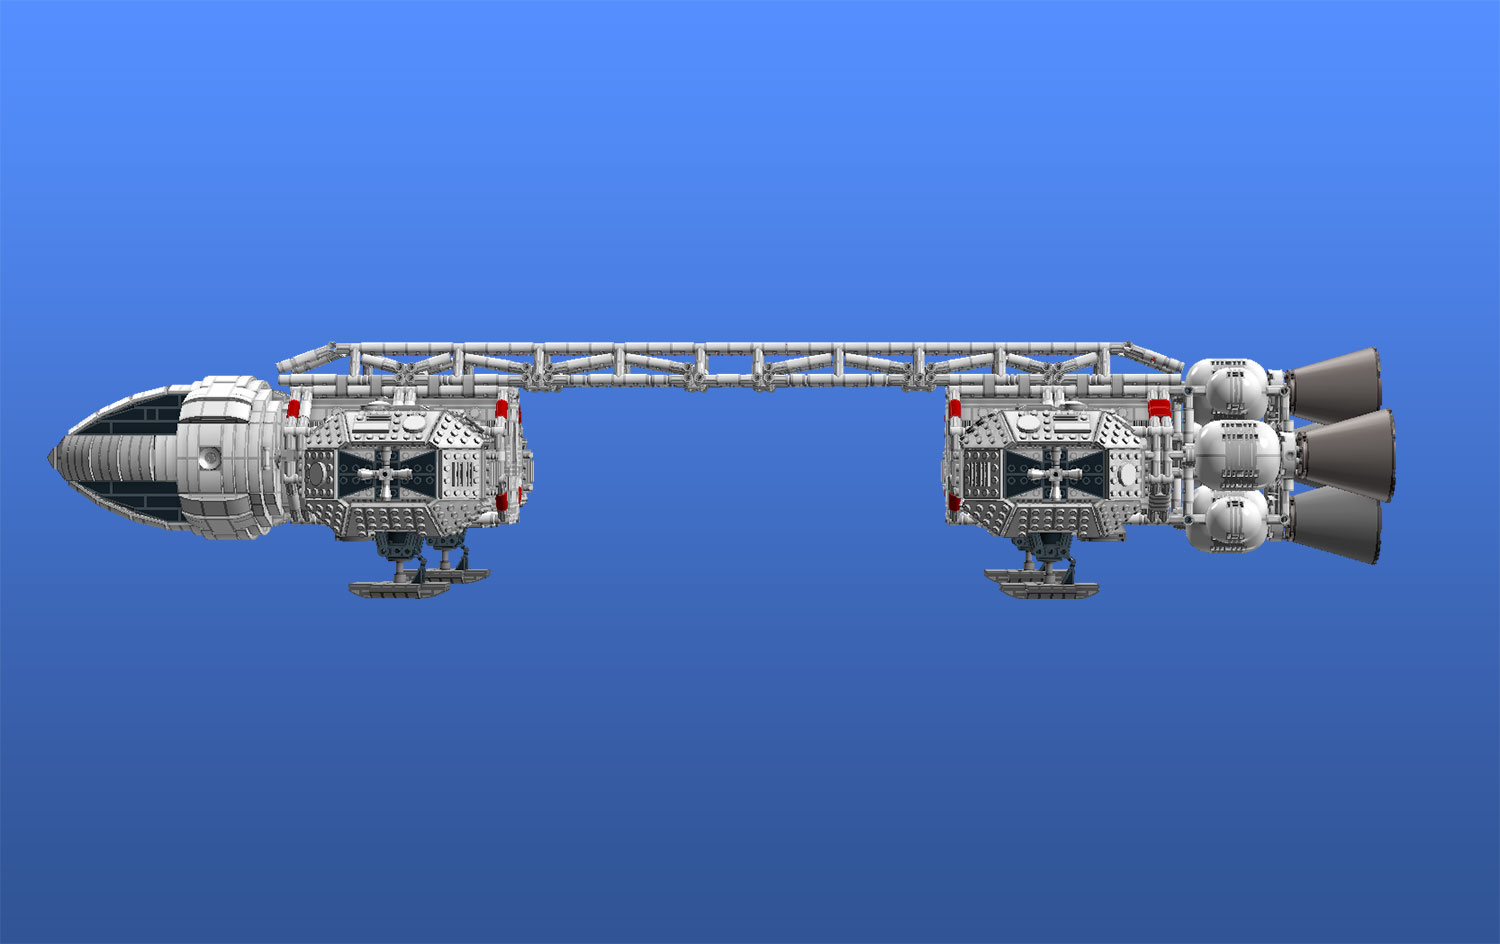
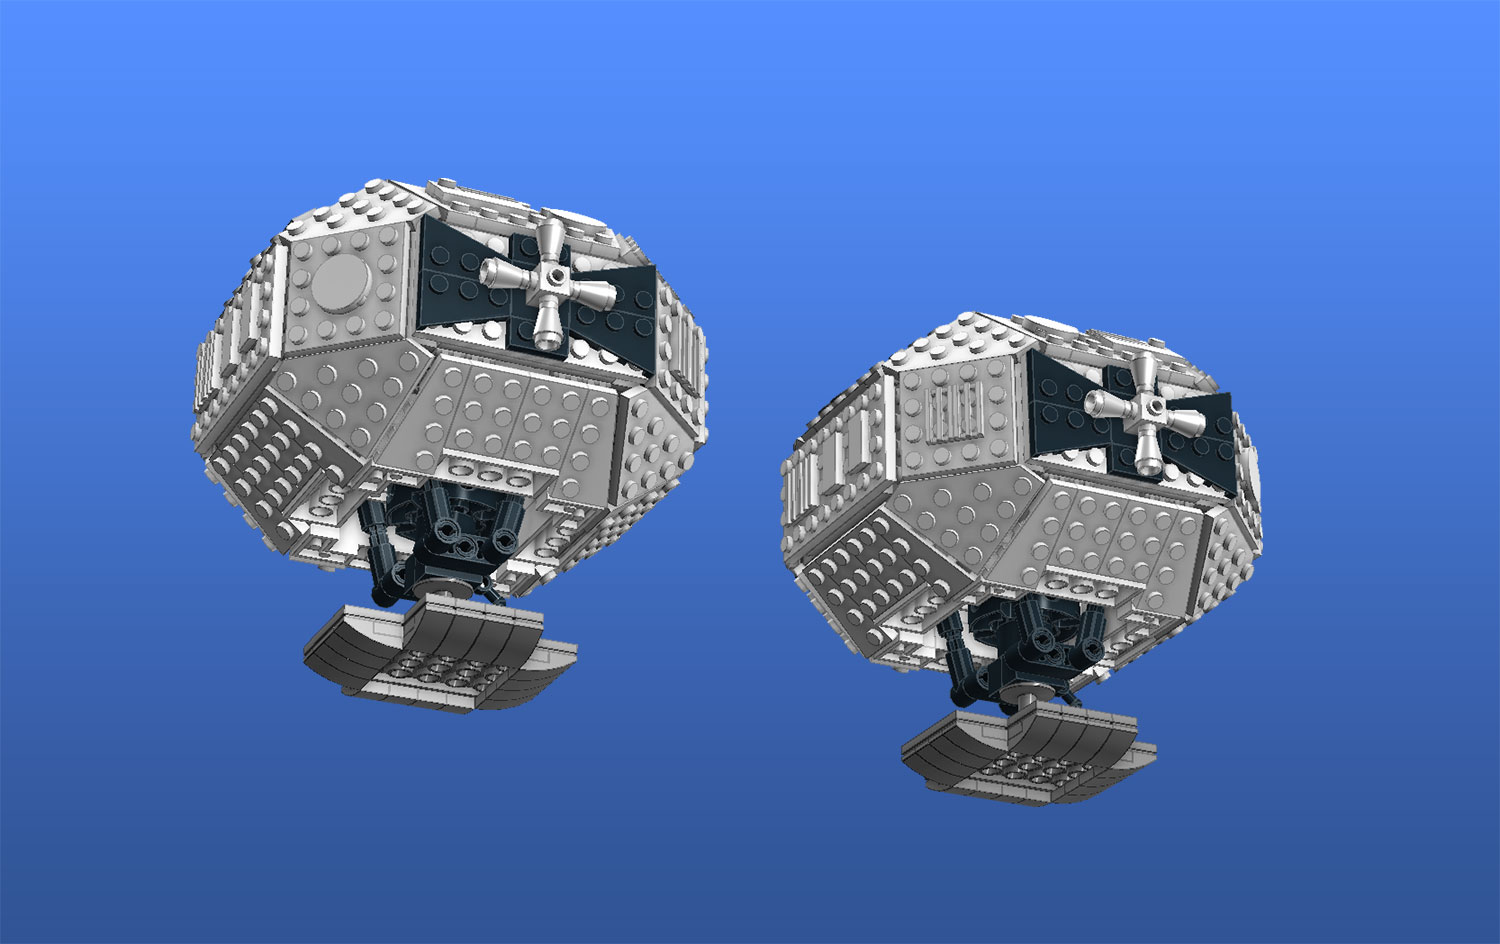
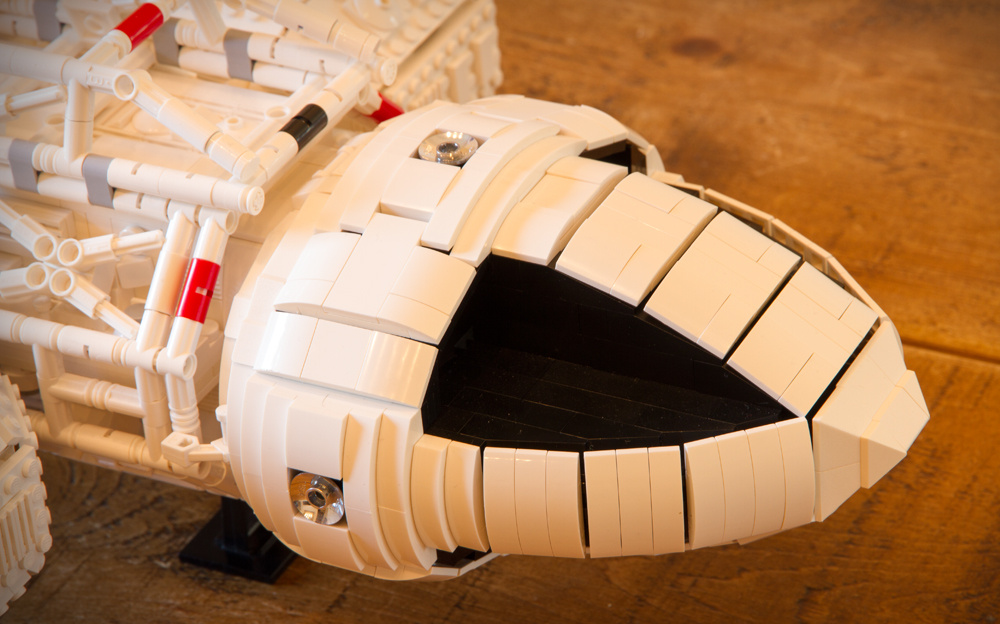
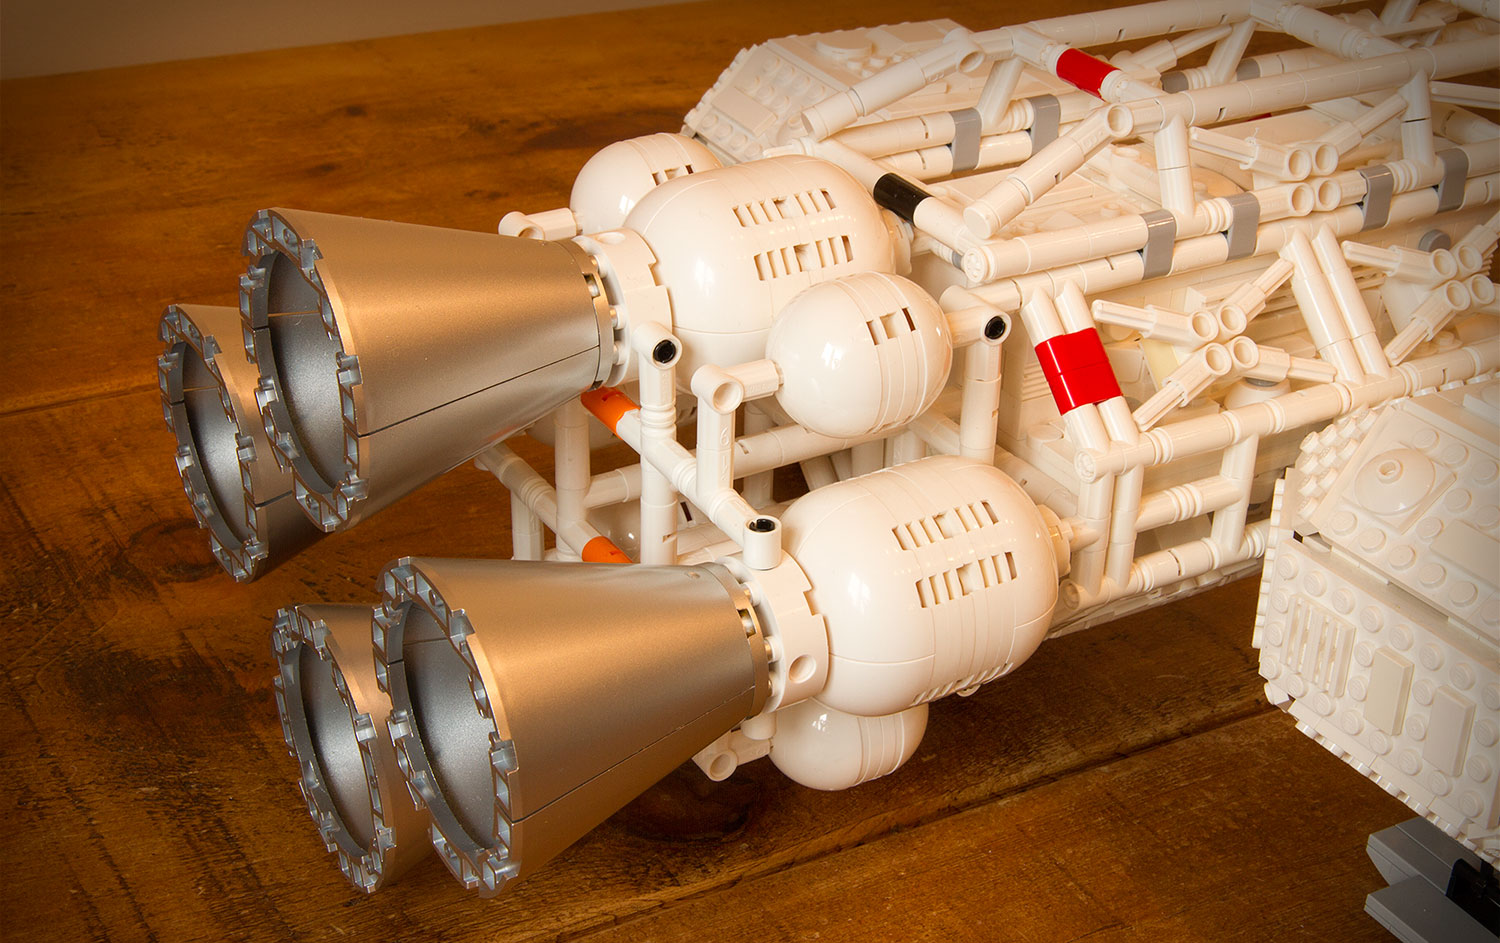
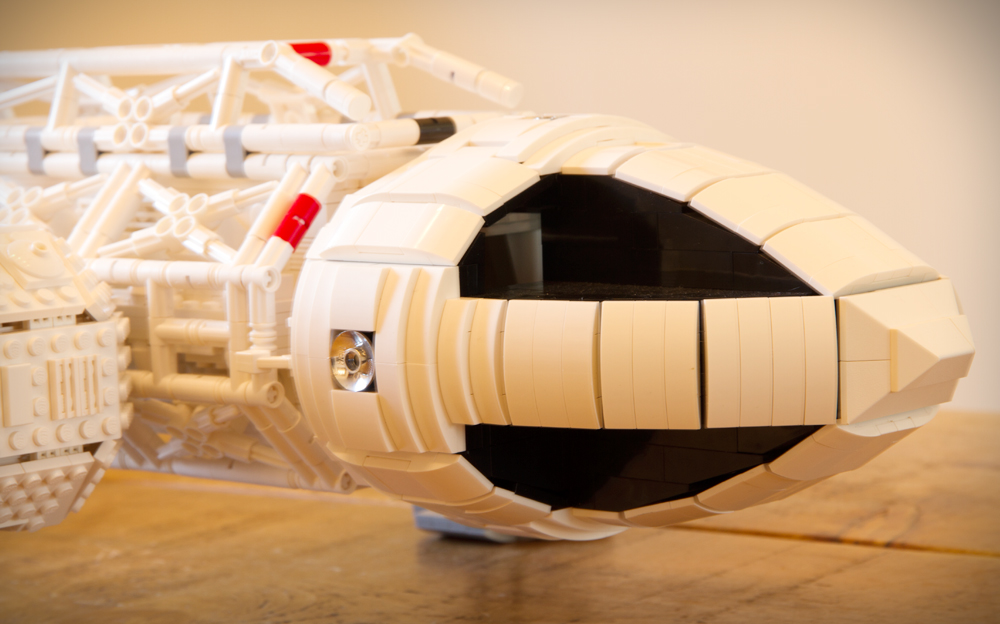
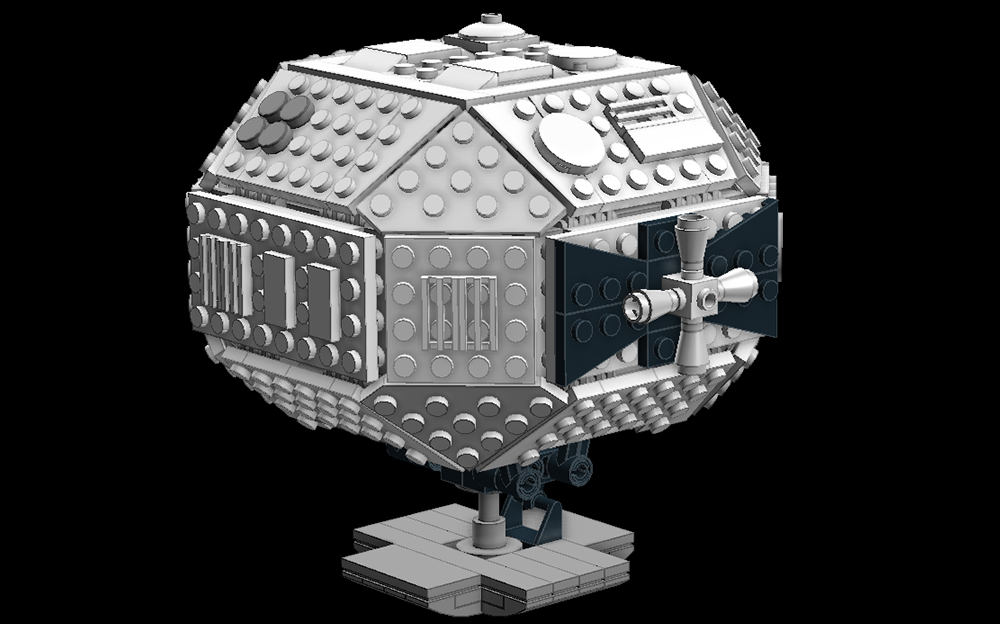
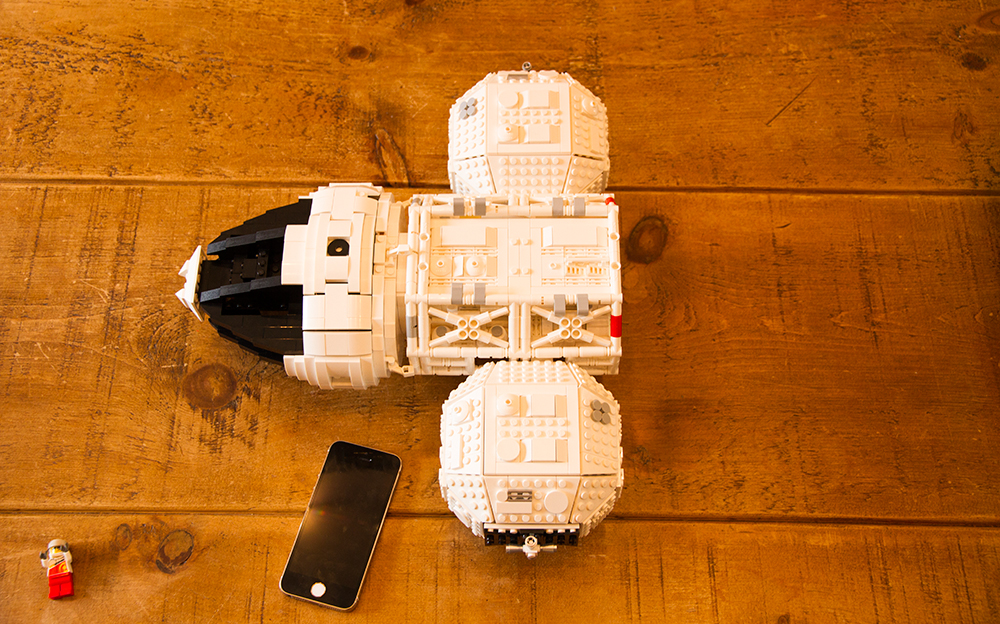
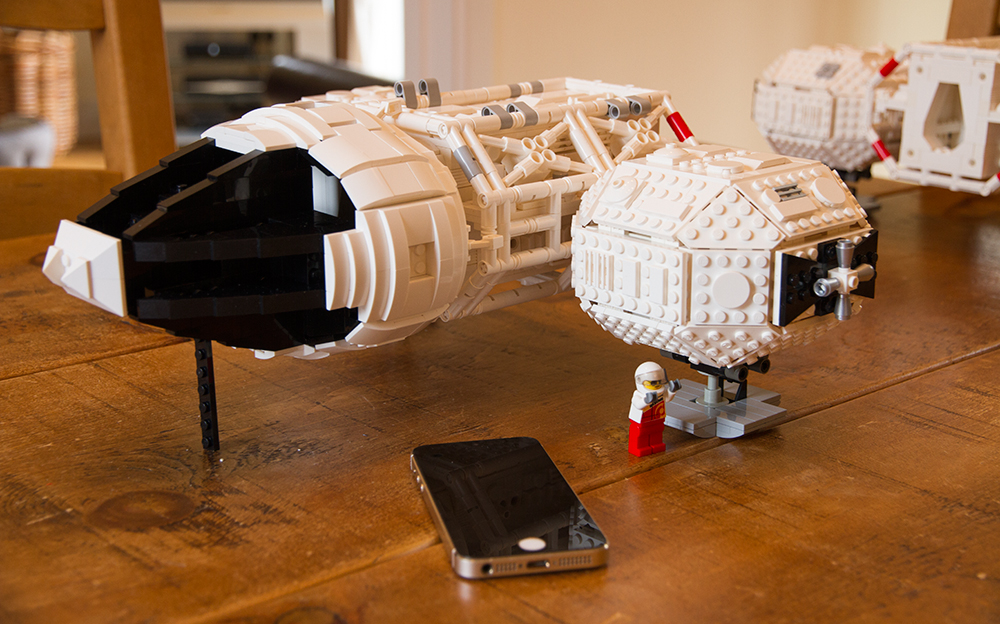
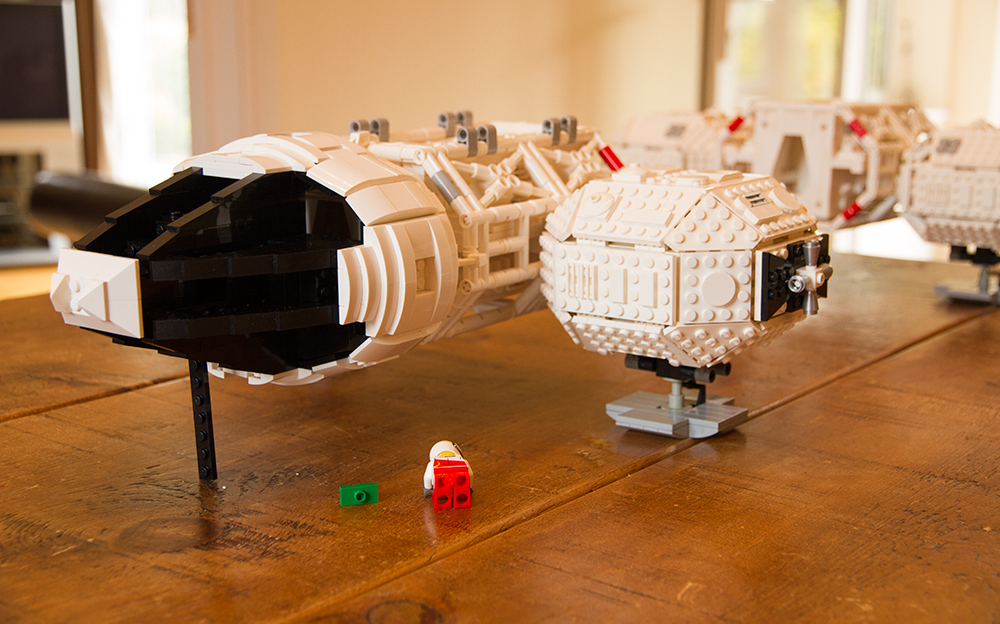
The only other cool(ish) series around was Star Trek. Nothing wrong with that but for the young impressionable viewer with a box full of Lego and an urge to explore space, the Enterprise NCC-1701 was just a bridge too far (no pun intended). The Eagle Transporter, however, was achievable. Its scale was just about sensible enough and with a lot of imagination and enough multi-coloured pieces it was possible to get the basic shape. Some of my models were even in white but due to severe lack of bricks they were often compromised with copious quantities of blue, grey, yellow and red bricks.

Roll on 40 years and, with a Lego mad son in tow, I decided to rebuild my 'amazing' childhood Lego Eagle. I had given my son all my original Lego some time ago so I was sure that it would be possible to build my old design of the Eagle transporter. Could I build that amazing model I once did? The answer was 'no'. All I could build was a blocky, multi-coloured estimation that had all the scale and finesse of a jet propelled matchbox.

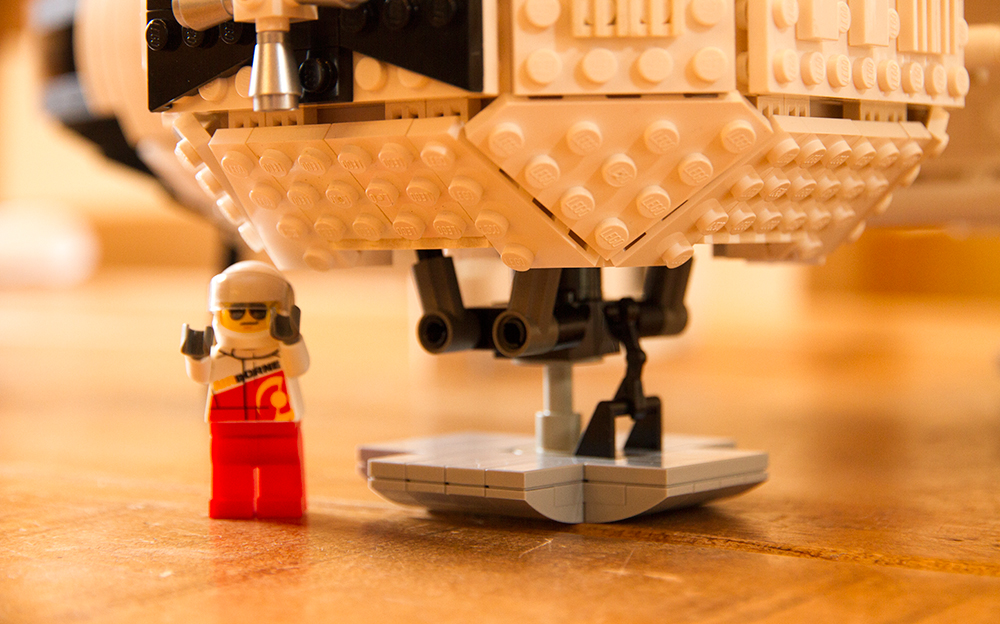
Obviously my youthful imagination was a great deal more colourful than it is now. The mists of time had also obscured some important facts; my original Eagle models were relatively small and pre-dated the mini-figure (which wasn't introduced until 1978). In my mind I had built Eagles for mini-figures but in reality mini-figures weren't even around at that time!

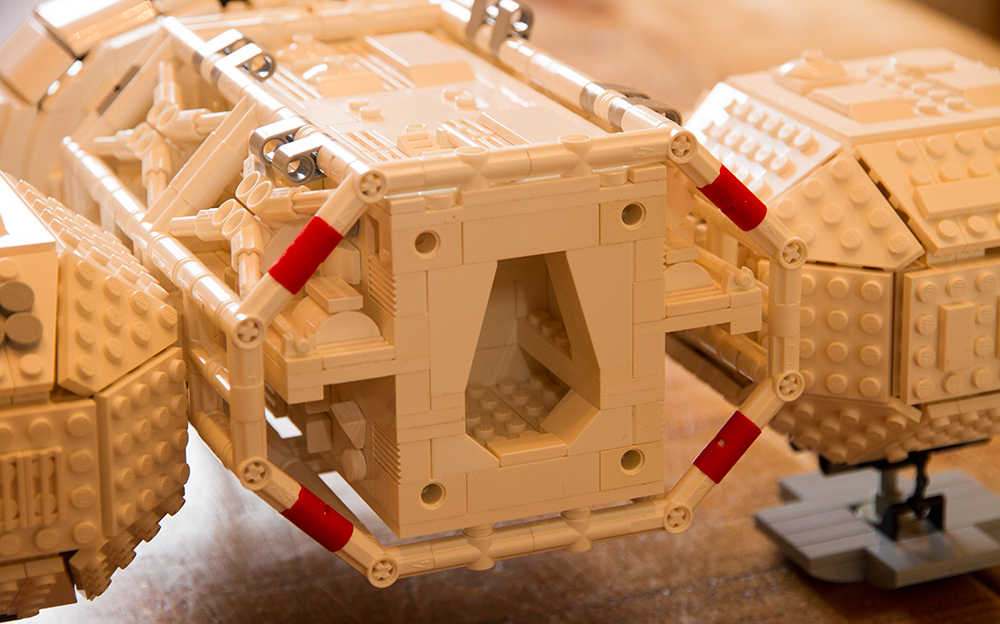
Lego has come a long way in the 40 years since I was building. Back then we had blocks, slopes and plates with a few odds and ends like windows etc. Lego was a square world!

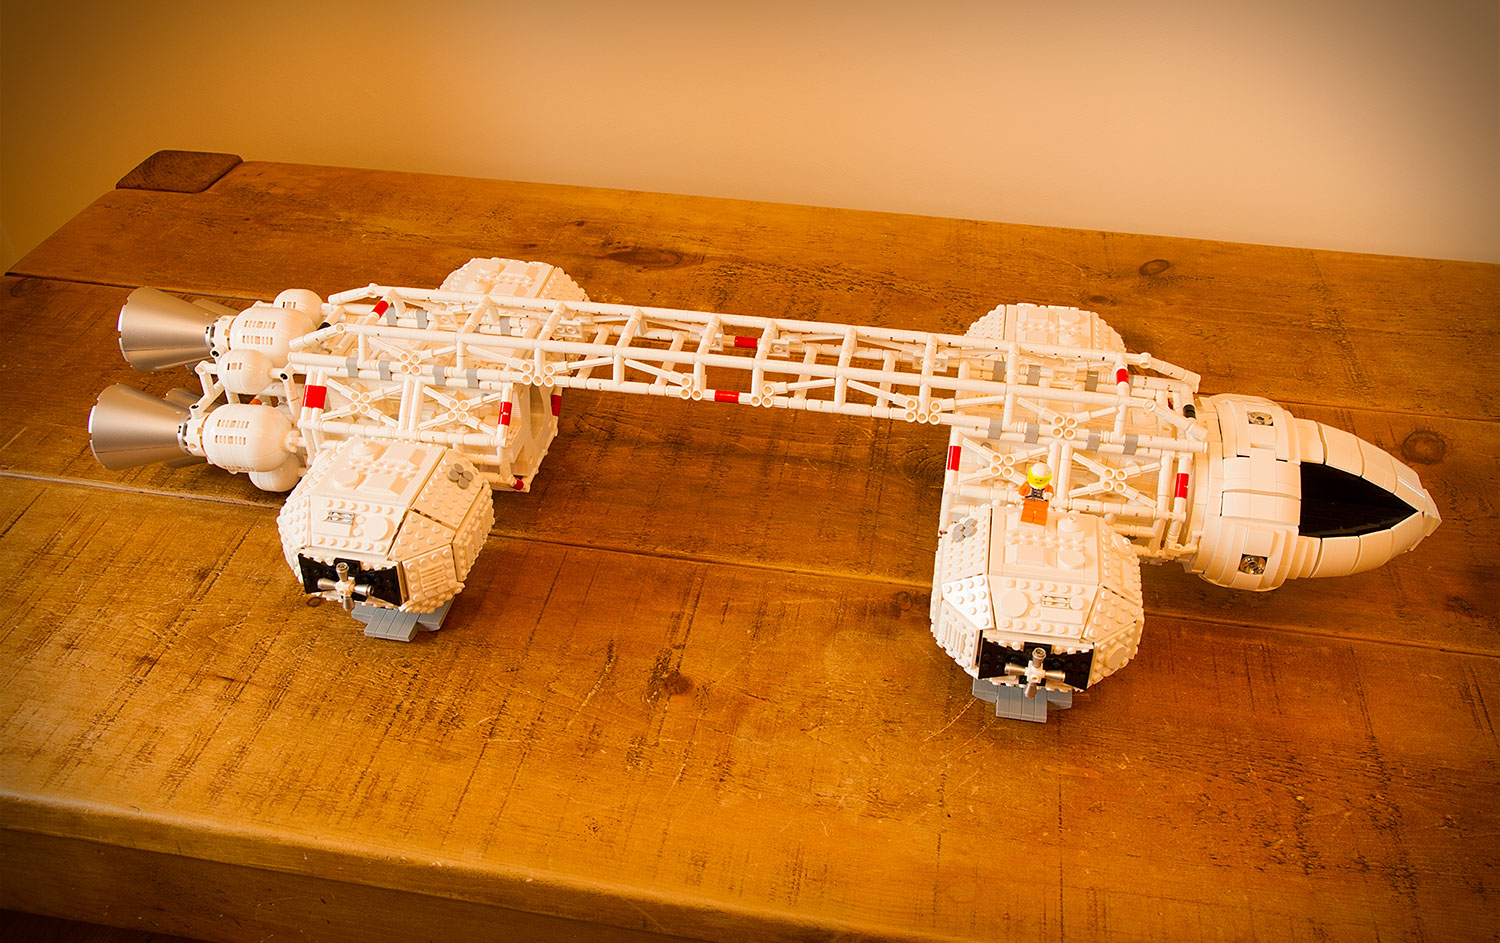
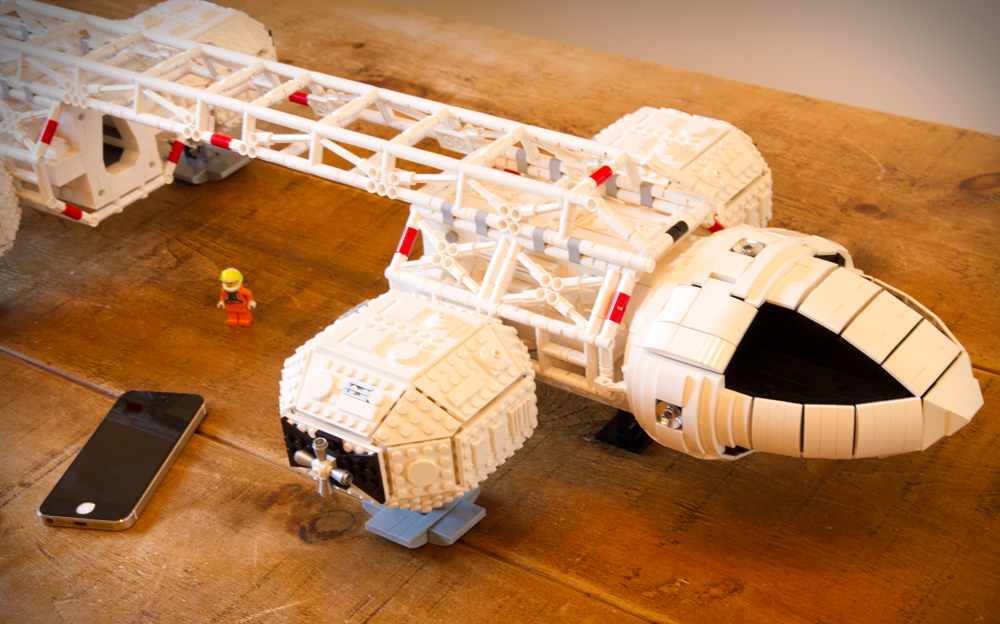
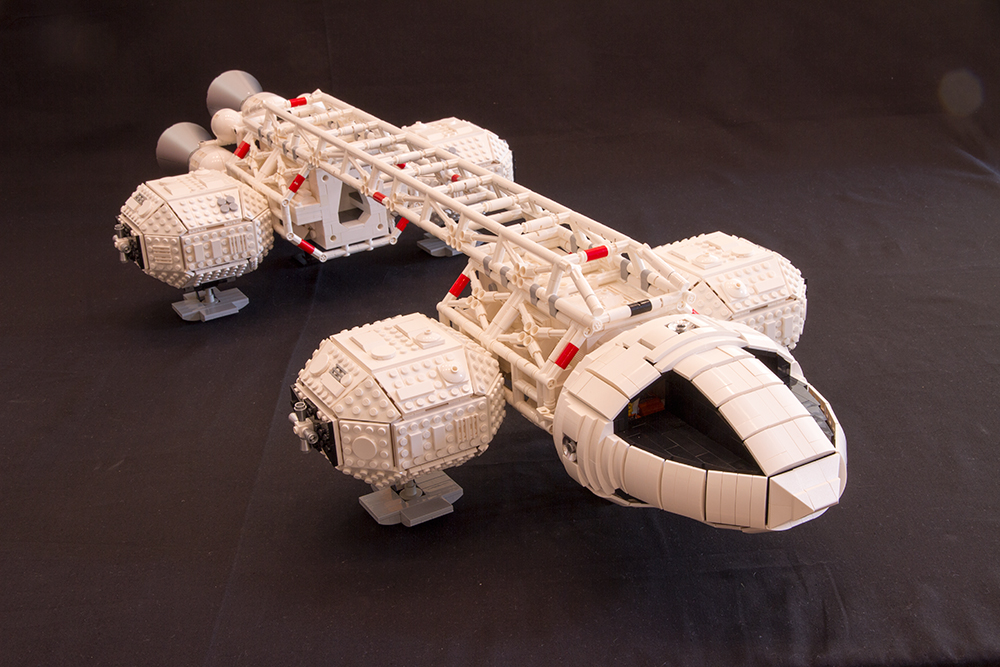
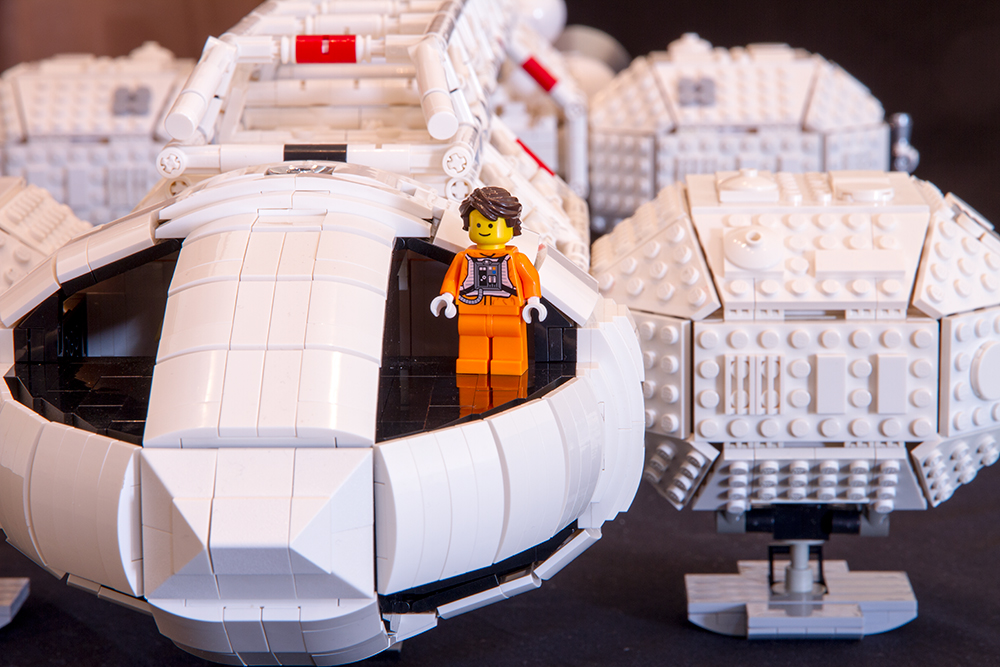
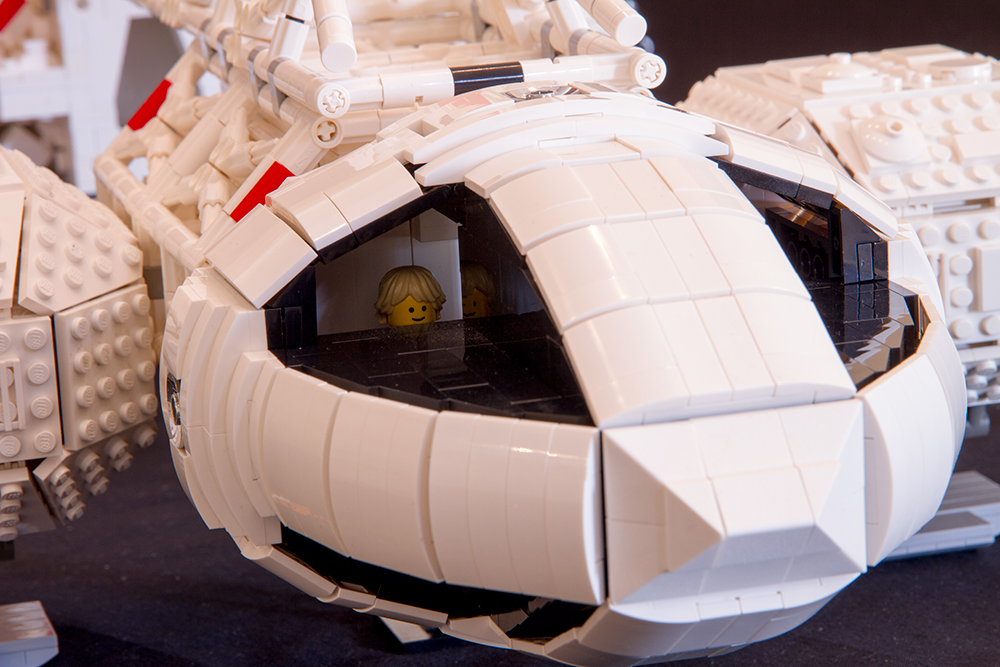
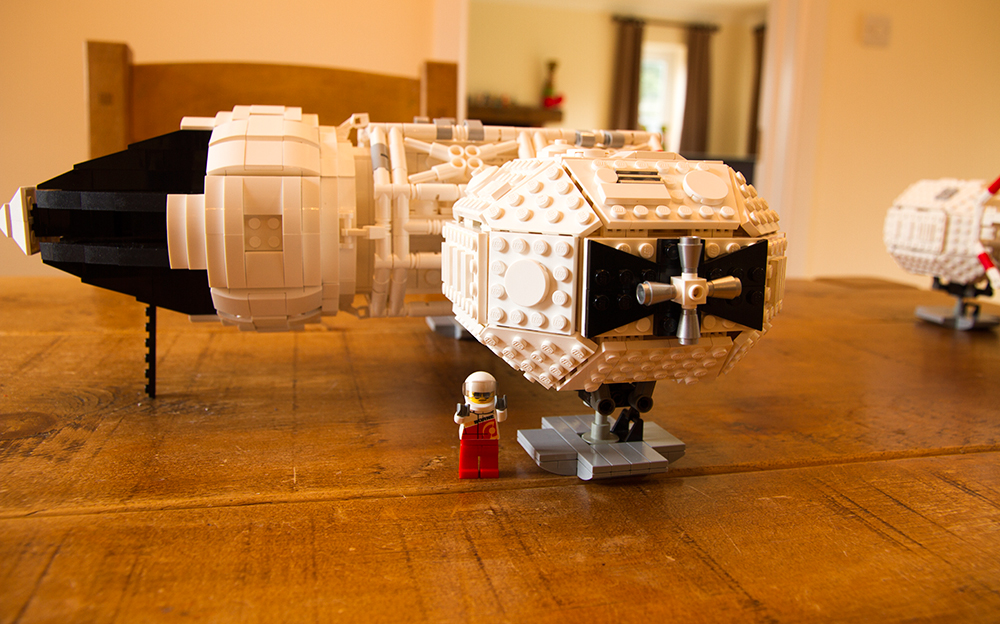
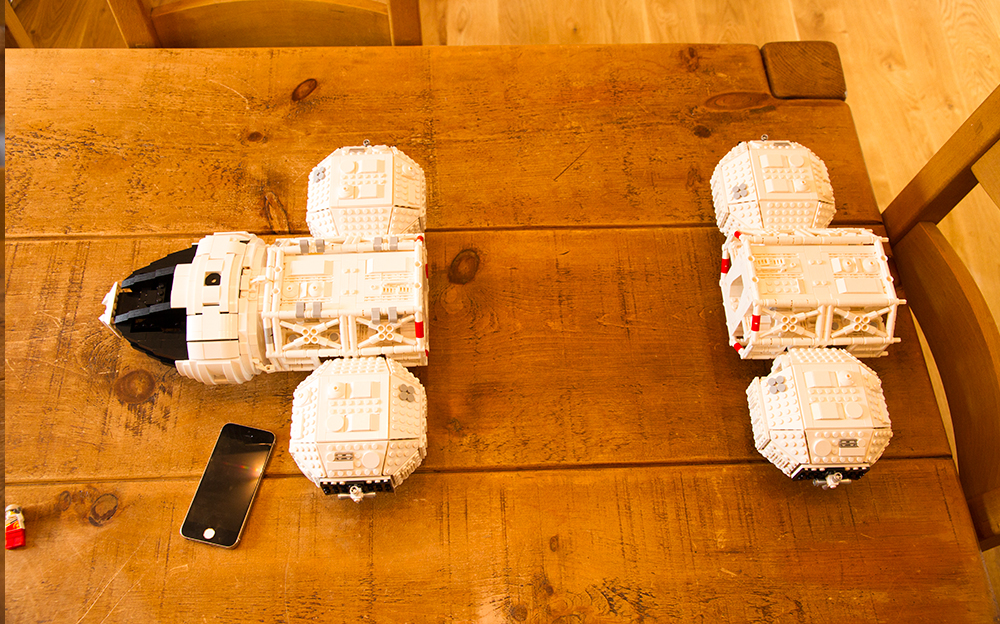
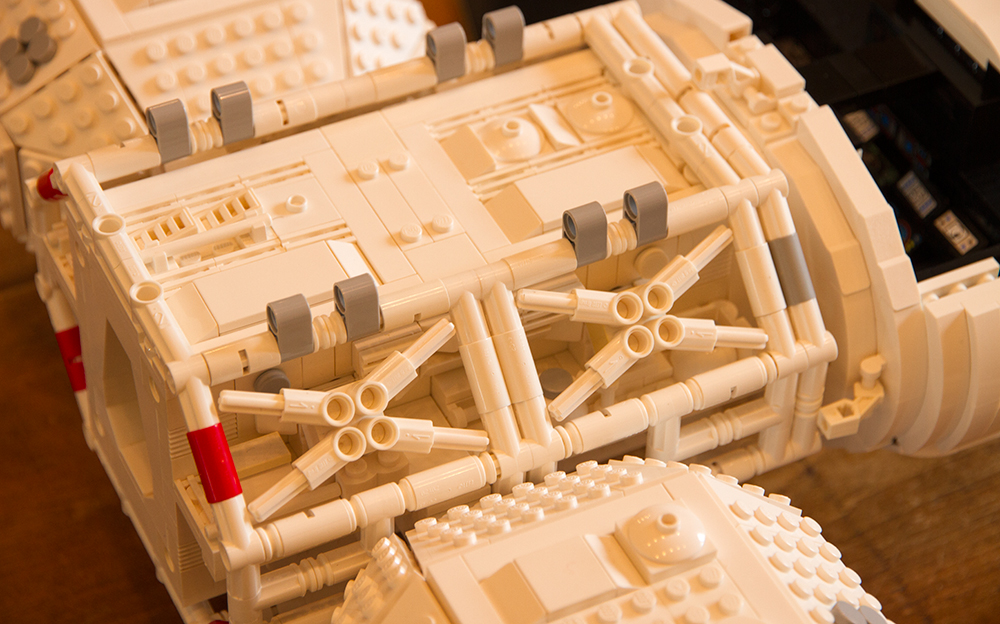
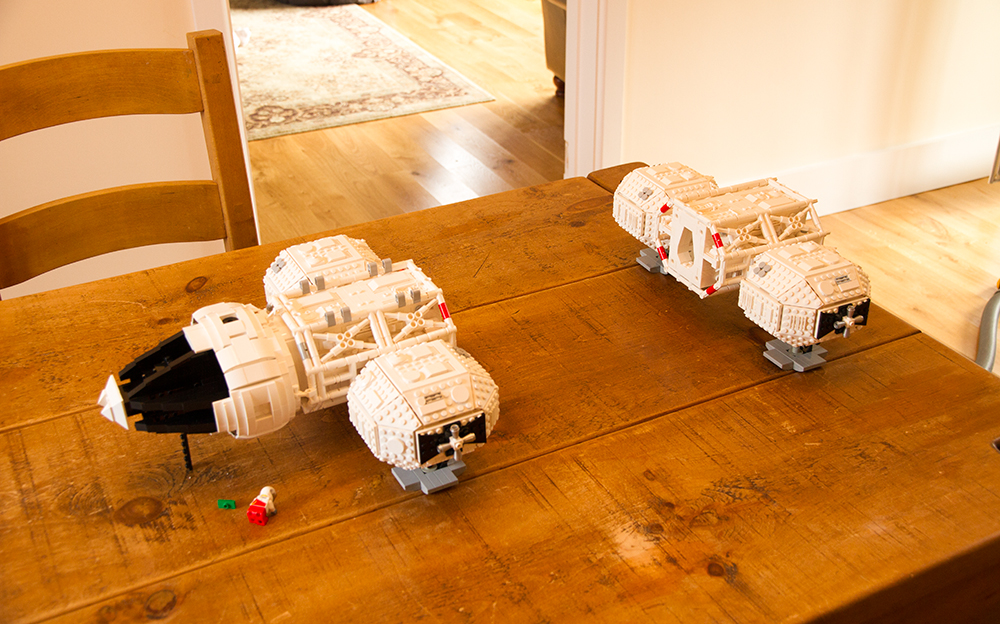
Now Lego has moved on a bit and being an 'adult' and the master of my own finances it occurred to me that now I could build that dream Eagle Transporter to mini-figure scale. I found tools like Lego LDD along with on-line Lego market places to source the parts.

And so the project began...

Design

Re-inventing the wheel.

I did find a couple of good MOC Lego Eagles on line. My original idea was to download a cool design from the web, order the bricks and just build it. The only real design that was out there for download was from 'Kurt'. A great design in 3d (link here to Kurts flickr page). The only drawback was that it can't really be built with existing Lego. A significant amount of the technic parts he had used have never been produced in white and some of the techniques were going to result in a lot of potential weakness once you commit to plastic. In fairness Kurt does stipulate that he cannot guarantee the availability of any parts used in his model, but a quick look on Bricklink confirmed my fears that many were simply unavailable in the 'correct' colours.

This forced me to completely redesign the model from scratch and ensure that it was built from readily available Lego bricks and that it would hold together under it's own weight. At this point I have to give due respect and a nod in the right direction to Kurt (his fuel tank design is genius and I have definitely used his panel pattern for my model). If you get the chance he has many models under his belt and without his great virtual Eagle I would never have undertaken such a mammoth design and build.

Design software.

I set off using LDD (download link here) although there are some alternatives out there LDD seemed like a good place to start.

The main advantage of design software is that you can draw designs and click together virtual parts and then check on sites like Bricklink to see if the parts you are proposing to use are actually available (and for that matter that they are not so rare as to be prohibitively expensive). That way you can optimise your design from a brick buying and practicality perspective.

One of my main problems were the ships 'skeleton' structures. Getting those even half looking decent with parts available in white was troublesome to say the least and required some lateral thinking and a bit of creative building. It would seem that the 'technic' world of Lego is a dull blueish-grey place.

A question of scale.

What is the scale of an Eagle transporter. Now THAT is a good question. It seems like way back then scale was a matter of convenience. Internal sets for the TV show just didn't match the external scale of the Eagle in any way. Scale was 'manipulated' significantly to fit varying requirements in each episode and sometimes to fit the space in the studio. A good example is the that often there isn't enough room for sliding doors to slide open!

There are multiple images around giving an 'idea' of scale but the only real answer was: Do what looks right as there isn't a definitive answer.

Ordering Parts

Where to buy

Some parts have been bought from eBay, mostly bulk items like bags of 100 smooth tiles etc. Some eBay stores have very good pricing, but most are charging way over the odds for bricks. Most of my orders came come through the brick marketplaces like Bricklink and Brickowl.

Apparently for real bulk ordering then direct from Lego is the answer, providing you are willing to wait months for delivery (many a supplier tells of long delays).

Some white Lego was bought off eBay by the Kilo. At around £10-£15/Kg it can be a good way to source bricks. I was lucky and found that most of my lots appeared almost new and I got some real bargains. It's always handy to have some spare bricks floating around to test ideas and to help out of you have a sudden 'Eureka'! moment and need to change a model in a hurry.

As I mentioned before the two dedicated Lego market place sites I used were:

Both of these sites allow you to build a wish list of parts and go shopping at thousands of retailers specialising in individual Lego bricks. Brickowl lets you import your model directly from LDD into a Brickowl wish list of parts, but caution is needed with part numbers (see below).

Ordering

Both sites have tools to allow you to optimise your experience and tweak your preferred suppliers to get the price down. Always keep an eye on postage costs and don't go for that one supplier that seems to have every brick you need in stock, It'll probably cost you at least twice the price of anywhere else (you know who you are!).

Most suppliers ship quickly from all over the world. Obviously it is quicker to use UK suppliers and the postage is minimal so you can buy just a few pounds worth of bricks at a time. Do that with some of the European suppliers and you will pay more in postage than the bricks are worth.

If you can keep your foreign orders big enough to be cost effective and then mop up any oversights and additional items from domestic suppliers.

As far as I can tell it is a fairly level playing field with regard to cost. No one country seems to be cheaper than another. Prices for the same brick vary enormously and shopping around is definitely the way forward.

Bricklink has useful pricing data showing you trends and how much the bricks you want have sold for over a period of time. Very useful to know before you buy. No point making a design that uses a rare brick that costs £2 each and that you need 240 of them and the most any one supplier has in stock is 3 (yep, nearly made that mistake).

Both websites have a good deal of information about the colours and availability of items as well. For example: most of the technic Lego simply isn't available in white; very good to know when you are designing.

Part numbers and variations in brick design.

When you are using design software, don't always trust it to provide the optimum part numbers for your bricks. I have found that sometimes a brick (or its colour) may be obsolete and when you go looking for it by part number it can be difficult to find and expensive. Take your time when looking for bricks as obsolete parts often have almost identical replacements which are plentiful and cheap.

Choosing the perfect colour can be a compromise and can be frustrating. Some colours have been phased out whilst other are the same in name but have a different tone. In 2003 out went traditional 'Grey' and 'Dark Grey' and in came a Grey with a blue tint grey. Now known as Light, Medium and Dark 'Stone Grey' by Lego and often described as Bluish-Grey or even 'Bley' unofficially. This makes identifying and colour matching really hard!

The part availability and consequent pricing of a new colour is far kinder than the old. We have lost many of the old colours in favour of a whole host of new variants. Just pray the parts you need in the same colour are available in the same colour!

Used Vs New bricks

Most of my bricks are new. Some are out of production and are not available as anything other than second hand. Most of my used bricks are as good as new and to be honest I have difficulty in telling the difference. As long as a brick is clean, no teeth marks, has not gone yellow and is genuinely hard to tell from new then it goes in. Any bricks on the outside of the model are NEW. the only place for used bricks is internally and out of sight.

click to enlarge

Suppliers.

A quick mention to all my favourite suppliers on Bricklink and BrickOwl who I have ordered from, All of which I would thoroughly recommend:

A special mention to 'HELGE's sets & bricks' who were so gracious when an order went missing. Their customer service is exemplorary.

Build

To glue or not to glue, that is the question.

During the design process it became apparent that some small areas were going to require a little glue to keep them structurally sound, typically where the weight of Lego surpassed any reasonable building techniques.

Lego is designed for building within certain criteria, push it out of is comfort zone (with large models) and you find all those little pieces start letting go of each other. It reaches a point where the more Lego you add to strengthen, the more weight you add, resulting in another failure elsewhere. Add to that the ABS's tendency to bend and you can be snapping plates before you know it.

I anguished for a long time as to whether to use the dreaded glue. After a chat with various people it became apparent that gluing is very frowned upon in the Lego community. I totally get not gluing your kids model, but this was a one off and in a very few places the plastic needed some help.

For Example; If a group of pieces is anchored to the model by one single stud then it is likely that it will fail. If I can glue that single stud to overcome that point of failure and maintain the design, then all is good.

The standard solution for gluing is MEK.

click to enlarge

Fuel pods / Landing gear

This was actually a fairly straightforward part of the build. Just a little bit of tweaking along the way to ensure that structural integrity was maintained.

The only real changes I made to my original design was to swap round a few of the internal parts by 90 degrees to make the Fuel pod attachment points stronger. Luckily it didn't require any extra bits to do.

It was a slight rework of the original design but now the design files have been modified to reflect the changes, no one would be any the wiser.

Gluing was needed on the Plate 1 x 2 with 1 Stud (3794) where it met the Wedge Plate 45° 4 x 4 (30503). The single stud was just not man enough to allow the Wedge to stay on during assembly. I ended up with 64 glued joints in total, one for each Stud/Wedge interface. Now the wedges stay in place (even the upside down ones) and are VERY robust.

Maintenance Pods

These are the caged structures either end of the Model.

Again, not much to report here. The original design has been stuck to really accurately and everything came together quite nicely. I had to make a minor alteration to the design at the point where the Fuel Pod attachment beams enter the Maintenance Pod.

Originally you could look right through the pod but a structural 'web' was needed across the centre to help support the Fuel Pod beams and limit a potential point of failure. The it was disguised by making it look like a closed door.

Maintenance Pod 'cages'

The cages that surround the maintenance pods took a bit of work to get right. Being limited by available Lego pieces in the correct colour was frustrating. I was forced to use standard Lego angle connectors:

  • Angle Connector #1 (32013) 0 Degree
  • Angle Connector #2 (32034) 180 Degree
  • Angle Connector #3 (32016) 157.5 Degree
  • Angle Connector #4 (32192) 135 Degree
  • Angle Connector #5 (32015) 112.5 Degree
  • Angle Connector #6 (32014) 90 Degree

I would have liked to use Technic Connector Toggle Joint Toothed (4273) but these pieces are only available in grey!

The cages are not exactly how I would like them as a result but they are close enough to the original ship design to be acceptable.

The only advantage of using the pre-set Lego angle connectors is that the cage is immensely strong. in fact the cage is so strong it can be used to pick the model up.

During the build I required quite a lot of white Axles. All the white axles used in the design files are available as standard parts, however, some are rarer than others. To keep costs down I bought a job lot of white 12L axles and cut them rather than spending a fortune finding axles in the right length/colour.

Some of the shorter axle lengths (in white) are several pounds each while 12L white axles are readily available and only around £0.10 each. It's a no-brainer. I made sure that all cuts were made to a tolerance of 0.01mm and that the ends were finished neatly and squarely on our sanding machine. No cut end is visible anywhere on the model.

Making the 'Spine' Stronger with Stainless rod.

To make the 'Spine' of the model more rigid and ultimately more structural I used 1/8" stainless rod.

The black Lego pins (2780) have a hole through them which is exactly 1/8”.
This means that you can slide those little black friction pins on to the onto a 1/8” stainless rod. Each time you slide a pin on, you follow it with a Pin Connector (62462) which pinches the pin inside and as it clicks into place it clamps the pin tight onto the rod.

You just keep going with pins and connectors and before you know it you have a SOLID Lego Pin Connector structure. The triple pins (6558) and Axle pins (11214) don’t have a hole quite big enough, so I gently drilled them to 1/8” with a Dremel so that they would follow the same slide-on and pinch routine that the standard pins did so well.

All you have to do is make sure that it is true 1/8” and not metric 3mm as some material advertised as 1/8" imperial is actually a metric equivalent which does not give the pins the grip (and consequently strength). What you actually need in metric is 3.175mm. Lots of manufacturers make 3.175mm (because a lot of engineering is still made in imperial sizes but labelled with metric measurements now - same product different label!). The main issue I have fond is the 1/8" and 3mm and 3.1mm and 3.175mm and 3.2mm can all be advertised incorrectly. I have visited many shops with a dial gauge who report to stock 1/8" or 3.175mm only to discover any of the sizes mentioned before, Bloody frustrating as only the exact 3.175mm will give the interference fit you want.

Gallery

Final design images from Lego Digital Designer

These are the final images used for the project from LDD

Final images of the finished model


More images from the project development

Here are some of the images from the development of the project, showing early designs and build pictures.

Other Peoples Builds

Joakim Åberg

Joakim was one of the first to take up the Lego Eagle Transporter Challenge, and boy has he been successful!

About 20 seconds after finishing his model he was off to the Swebrick exhibition. Stirling work from Joakim, with a great looking crew pod!